Jewelry knots and macrame knots are usually easy-to-learn, everyday knots used for starting and finishing their design.
We will show you how to tie basic jewelry-making knots so your designs are secure and long-lasting.
Although some of these types of jewelry knots seem incredibly basic, it is really important to know the difference between them. Choosing the right one will give your jewelry and macrame a more professional look.
You can then check what kind of jewelry compliments your look, and get on with making your own pieces.
We are going to take a look at seven basic types of jewelry knots/macrame knots. They are – the overhand knot, the half knot, the reef/square knot, the granny knot, the lark’s head knot, the surgent knot, and the slip knot.
There are, of course, many more types of basic macrame knots, but these are used most often.
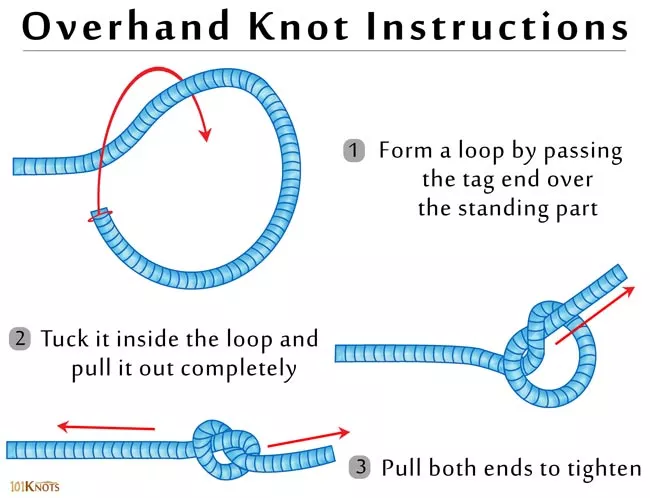
How To Tie an Overhand Knot
Let’s start with the overhand knot. This knot is incredibly versatile and can be used in a variety of ways.
One common use of the overhand knot is as a stopper knot at the end of a string, which prevents beads or other materials from sliding off.
But, it can also be used to finish off existing threads in bead weaving. By incorporating overhand knots into your jewelry designs, you’ll be able to create secure and long-lasting pieces.
- Pull the short end of the string back on itself and create a loop
- Tuck in the short end through the loop
- Pull both ends until the knot is tight
Cord Type for Overhand Knot
Overhand knots are a simple yet effective way to secure cords and strings in jewelry making.
However, the type of cord you choose can make all the difference in how your overhand knot turns out.
For bracelets and necklaces, a thicker cord like leather or hemp is ideal for creating a bold and rustic look.
For delicate pieces like earrings and pendants, a thinner cord like silk or cotton is perfect for creating a dainty and feminine look.
If you’re creating a multi-strand bracelet or necklace, using a waxed linen cord will keep the strands from tangling and create a sleek and polished finish.
Whatever your jewelry-making project, be sure to consider the cord type for your overhand knots to ensure that your pieces are both secure and stunning.
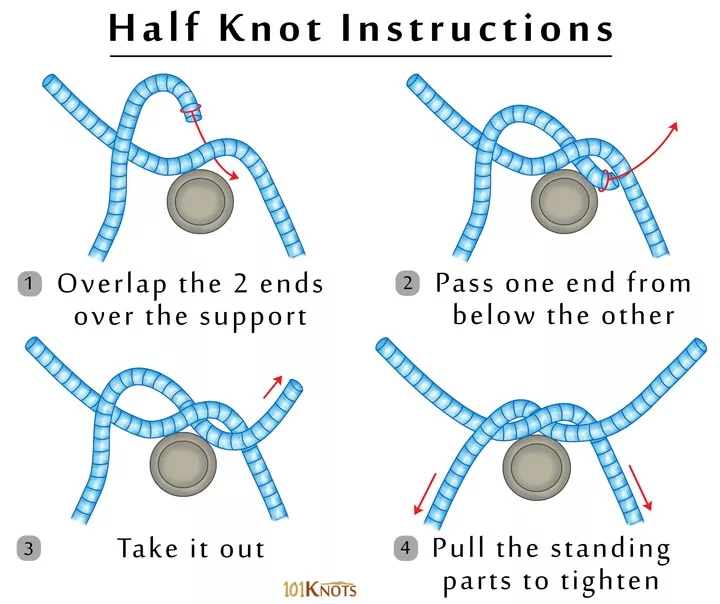
How To Tie a Half Knot
Next up is the half knot. This knot is great for joining two ends of the string together and is often used as a base for more complicated jewelry knots.
It’s also the knot most people use to tie their shoelaces.
By incorporating half knots into your jewelry designs, you’ll be able to create a variety of patterns and textures.
- Hold the two ends of the string in each hand
- Bring the left-hand string over the right
- Take the left end over and behind the right
- Bring it across the front and pull
Cord Type for Half Knot
The half knot is a versatile and simple knot that can be used in a variety of jewelry-making techniques, from macrame to stringing beads.
When choosing the cord type for your half knot, consider the weight and texture of the material.
For chunky, bohemian-style pieces, a thick cotton or hemp cord will add depth and dimension to your design.
If you’re creating delicate and intricate pieces, a thin silk or nylon cord will provide a sleek and sophisticated look.
For a pop of color and texture, try using a twisted nylon cord or a metallic cord for a touch of shine.
When in doubt, experiment with different cord types to find the one that best suits your design aesthetic and enhances the beauty of your half knots.
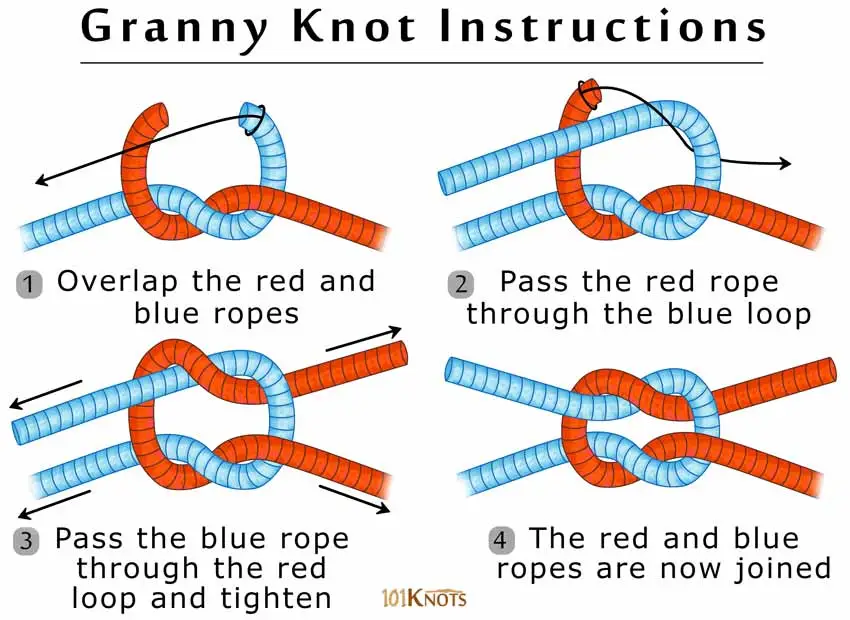
How To Tie a Granny Knot
Moving on to the granny knot. This is an easy-to-tie knot that consists of two half knots on top of each other.
While it may not be the strongest or prettiest of knots, it’s useful for securing a string around an object. By using granny knots in your jewelry designs, you can add a bit of vintage charm to your pieces.
It is a so-called, binding knot, used to secure a string around an object. It gets its name because historically, it was “the natural knot tied by women or landsmen”.
- Make a half knot, then repeat the process by bringing the left end over the right.
- Bring the right end down over the left, and then up through the back.
- Pull the two string ends tight to complete the granny knot.
Cord Type for Granny Knot
The Granny Knot is a simple knot that can be used in a variety of jewelry-making techniques, from beading to knotting.
When selecting the cord type for your Granny Knots, consider the material’s durability, texture, and color.
For a natural and rustic look, use a braided hemp or leather cord to complement earthy tones in your design.
For a more polished and refined look, use a waxed nylon cord to create a sleek and sophisticated finish.
If you’re looking to add a pop of color, try using a vibrant-colored cotton or silk cord to accentuate the beauty of your Granny Knots.
Whatever your design aesthetic, choosing the right cord type for your Granny Knots can enhance the overall beauty and durability of your jewelry pieces.
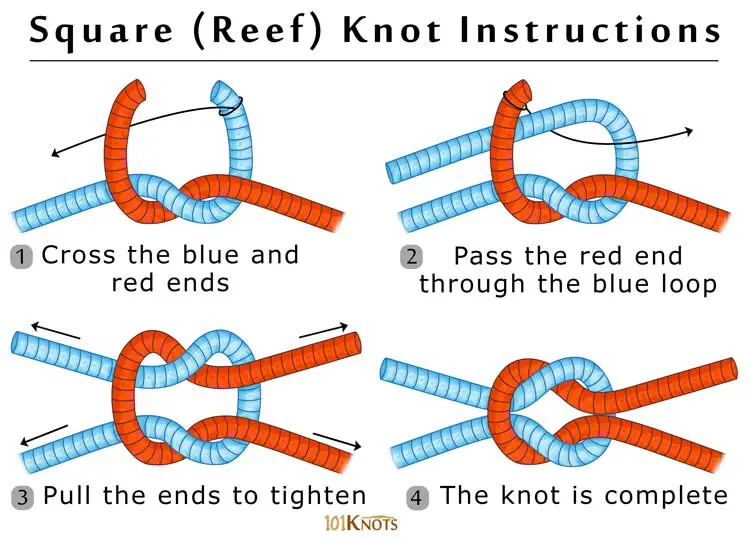
How To Tie a Reef Knot
A reef knot may seem very similar to a Granny knot. But it is a much prettier and more important, much stronger knot.
The other name for it is a square knot or Hercules knot.
There is a subtle, but important difference! What makes a difference is switching the side of the string end, after making the first half knot.
The reef knot is ideal for finishing off clear elastic cords and for securing the ends of decorative knotting in macrame.
By using reef knots in your jewelry designs, you’ll be able to create a clean and polished look.
- Start by making a half knot, proceed to make a second half knot but bring the left-hand end under the right end
- Bring the right end down behind the left end, and then up through the front.
- Pull the two ends tight, to complete the reef knot. This will create a prettier version of the granny knot.
Cord Type for Square/Reef Knot
When it comes to choosing the right type of cord for the square knot, it’s important to consider the weight and texture of the cord.
For lightweight projects, such as delicate bracelets and necklaces, a thinner cord works best.
For heavier projects, such as wall hangings and plant hangers, a thicker cord is needed to support the weight of the project.
Some good options for cord materials include cotton, hemp, nylon, and silk.
Cotton and hemp are popular choices for macrame projects, while nylon and silk are commonly used for jewelry making.
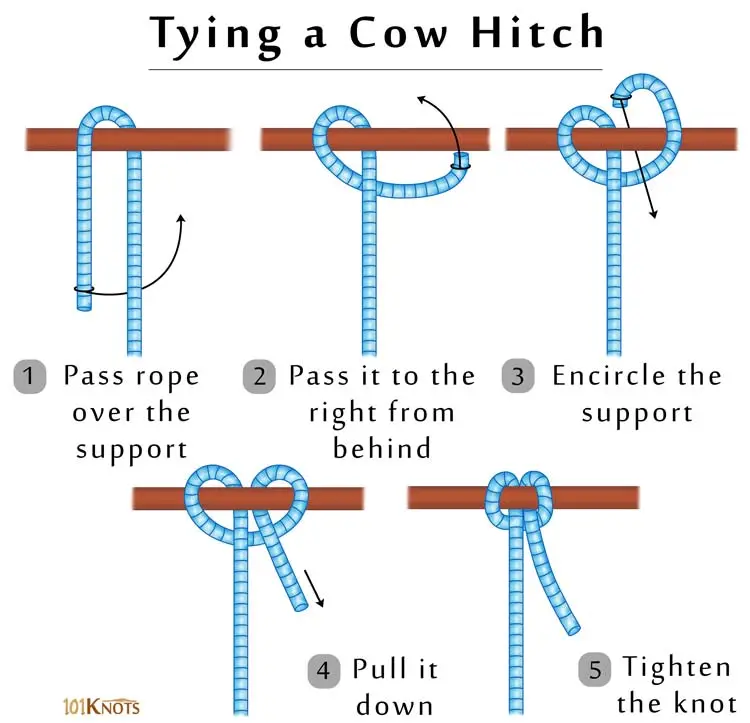
How to Tie a Lark’s Head Knot
The Lark’s Head Knot is a versatile knot that is commonly used to attach beads or charms to a piece of jewelry. It is easy to tie and creates a secure attachment point for your design.
To tie a Lark’s Head Knot:
- Start by folding a cord in half
- Take the folded end of the cord and loop it over the top of a bead or charm.
- Bring the two loose ends of the cord over the folded end and through the loop created by the folded end.
- Finally, pull the two loose ends of the cord to tighten the knot.
Cord Type for Lark’s Head Knot
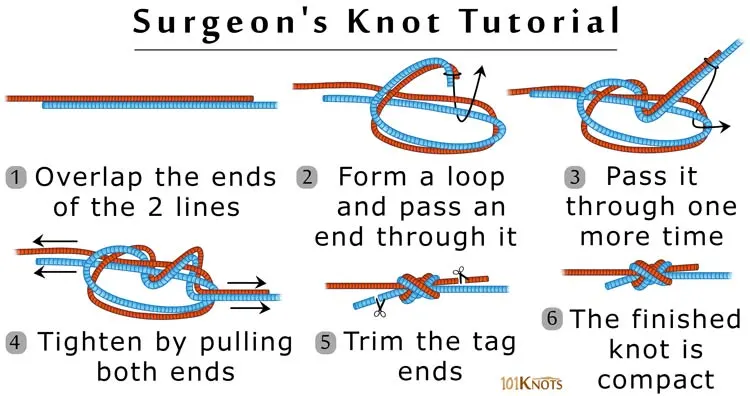
How to Tie a Surgeon’s Knot
The surgeon’s knot is a very useful knot when it comes to jewelry making.
It is particularly useful when you need to tie two ends of a string or thread together securely.
The knot is called a surgeon’s knot because it is a knot commonly used by surgeons to tie off sutures.
To tie a surgeon’s knot for jewelry, begin by crossing the two ends of the string or thread.
Then, tie a simple knot by passing one end of the string over the other and pulling it through the loop.
Repeat this process but instead of passing the end over the other, pass it underneath. This creates a knot that is more secure than a simple knot.
- Take two ends of the string or thread and cross them, holding both in one hand.
- Tie a simple knot by passing one end of the string over the other and pulling it through the loop.
- Repeat this process, but instead of passing the end over the other, pass it underneath.
- Take the right end of the string and pass it over the left end.
- Tie another simple knot by passing the right end over the left and pulling it through the loop.
- Repeat this process, but instead of passing the end over the other, pass it underneath. Pull the knot tight to form the surgeon’s knot.
Cord Type for Surgeon’s Knot
When using the surgeon’s knot, it’s important to choose the right type of cord or thread for your project.
You’ll want something that is strong and durable, yet thin enough to pass through the beads without causing any damage.
Depending on the size of your beads and the overall look you’re going for, you may choose a variety of materials, such as nylon thread, waxed cotton cord, or leather lace.
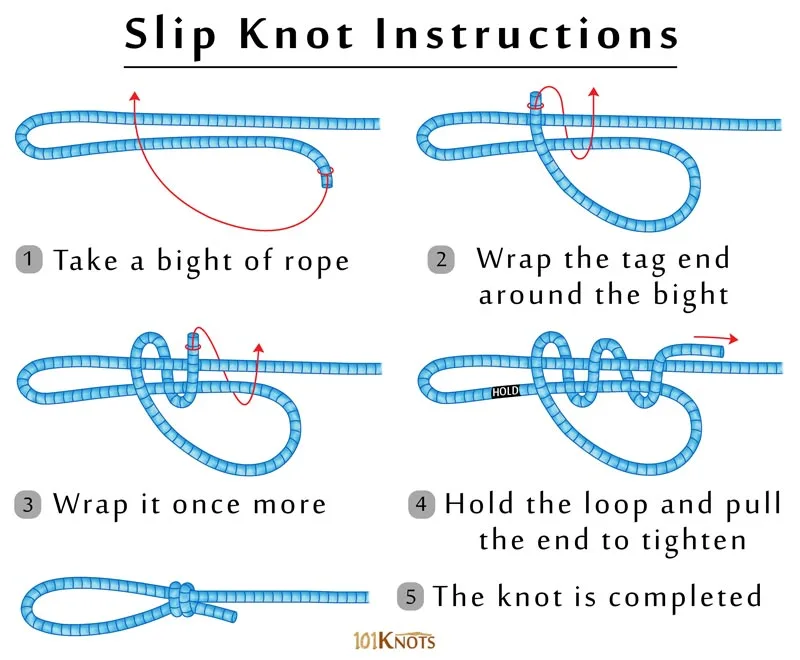
How to Tie a Slip Knot
One of the great advantages of the slip knot is its adjustability.
This is particularly useful when making necklaces or bracelets that need to fit a variety of different people.
To create an adjustable necklace, simply tie a slip knot at one end of the cord, and then attach the pendant or beads to the other end.
You can then adjust the length of the necklace by pulling on the slip knot and sliding it up or down the cord.
To create an adjustable bracelet, tie a slip knot at one end of the cord, and then thread beads onto the cord until you reach the desired length.
Tie another slip knot at the other end of the cord, leaving enough room for the bracelet to slide over your wrist. You can then adjust the length of the bracelet by pulling on the slip knots and sliding them up or down the cord.
To tie a slip knot:
- Begin by forming a loop at the end of the rope or string.
- Take the working end of the rope and pass it through the loop from underneath.
- Take the working end of the rope and pass it around the standing part of the rope.
- Finally, pass the working end of the rope back through the loop, this time entering the loop from the top.
Cord Type for Slip Knot
It’s important to choose the right type of cord for your slip-knot jewelry.
You’ll want a cord that’s strong enough to hold the weight of the beads or pendant, but also soft enough to tie and adjust easily.
For necklaces and bracelets, a thin nylon or silk cord works well.
For heavier pendants or beads, you may want to use a thicker cord, such as leather or hemp.
Incorporating slip knots into your jewelry-making repertoire can add a new level of versatility and customization to your designs.
Choosing the Right Cord for Jewelry-Making Knots
Choosing the right cord for your jewelry-making knots is essential to ensure a long-lasting and professional-looking design.
Here are some factors to consider when selecting a cord:
Material –
Different cord materials have different properties and work better for certain types of knots.
For example, nylon cords are stretchy and flexible, making them ideal for macrame knots, while leather cords are strong and durable, making them suitable for knotting and braiding.
Thickness –
The thickness of the cord you choose will affect the size of your knots.
Thin cords work best for delicate knots, while thicker cords are better for larger and more complex knots.
Color –
The color of the cord can affect the overall appearance of your jewelry design.
Consider choosing a cord color that complements the color of your beads or charms.
Texture –
The texture of the cord can also add interest and dimension to your design.
Experiment with different textures, such as smooth, braided, or twisted, to create a unique look.
Strength –
Make sure the cord you choose is strong enough to withstand the weight of your beads or charms and the tension created by your knots.
Conclusion
Hopefully, you will find a way to incorporate these basic jewelry knots into your jewelry-making routine. Working on these basics will make a good step towards more advanced knots and higher-quality jewelry.
Comment your questions below or suggestions for the next jewelry-making article. You can always contact us if you find it easier!